I know I promised reviews and makeup tutorials..I fail :(. I've been crazy busy with work..but I do have some product reviews I'm in the process of writing. It's the finishing that is dragging me down.
Blond was a fail as well. Pink and black is coming up, lets hope that works better :)
I will be posting a video tutorial for a quick face and then one for some super strawberry shortcake inspired eyes (I've been working on them for HALLOWEEN! So excited).
I'm in the countdown to October! I'm taking an awesome vacation to Disney World, and of course Halloween. I will try and do a video tutorial for Halloween makeup at least once a week till we hit it. Maybe a Vamp..a zombie..that kinda thing.
I'm pretty sure no one reads this but it's important to me to actually update once and awhile and stick to what I say.
So...that's all for now.
Monday, August 30, 2010
Wednesday, August 25, 2010
B-B-B-B-Blond....Pt. 1
Sooooo...now I'm a blond not so blond bombshell..sorta. Now that I'm going blond I fell like I might not cut my hair...I really like the cut I have now with the blond.
Lets start with my super awesome and not ghetto tools.
I used Manic Panic FlashLightening "AMPLIFIED" 40 volume bleach kit. I know.....super ghetto...but cheap. Lets face it, I'm a broke ass bitch...and I get a discount at Hot Topic. Normally I would not use a 40 volume developer, I think they are too harsh, and it is much easier to fry your hair with them. In this case, I didn't have a choice. I was pleasantly surprised with this one, my hair is still soft and not overly fried...yet. I'm only on my first bleach.
Next in my arsenal of not ghetto and way awesome tools is Aussie 3 Minute Miracle. Purchased for $2.50 at my local CVS, this deep conditioner is a find! Used once or twice a week it definitely makes a HUGE difference to bleached or processed hair. It is my go too cheap treatment when I fry my poor hair.
Now..the pictures.


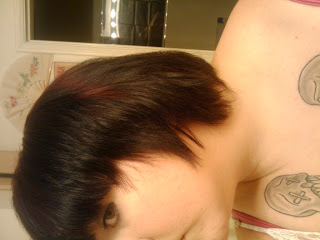
Not sure how well it shows up on these pictures, but my hair was black at the tips with red at the root. Tricky to lift. My hair is a natural dark brown. Please excuse my no makeup face :)
I didn't take pictures of my bleach process because I wasn't wearing to much clothing at the time. Bleach ruins clothes and I will ALWAYS spill some on myself. This time I got my leg.
I started out with my bangs because that is what everyone will see first. Then worked my way to the right, then left side of my face. Finishing with the back I left the bottom of my hair dark. I covered the top of my hair with a shower cap(included in the kit) and then blasted it with my hair dryer on its hottest setting.
Then the waiting.......
........
and waiting.........
.......
and more waiting........
Till 1 hour went by. That's right, I let it sit on my hair for an hour. I have hair that can take this because it is thick and coarse. If you have fine hair I would not recommend this because it will FRY. About every 15 minutes I went in and hit it with my hair dryer again. The heat helps the bleach work, and will help for maximum color lifting. Let me tell you this shit BURNED! I was so glad to get it off my head at the end of the hour, and I was sure I would have blisters. I didn't, so I might be a drama queen but OUCH!
Once I rinsed it, I let my hair soak up my Aussie deep conditioner for about 10 minutes. I know it says 3 on the bottle but after this kind of treatment your hair needs a serious drink of water.
Now to blow drying. I used it on my lowest heat setting and did small sections at a time. This is the scary part and why you need TWO bleachings if your going from dark to light.

I actually kinda like it...I look like a strawberry shortcake acid trip :)
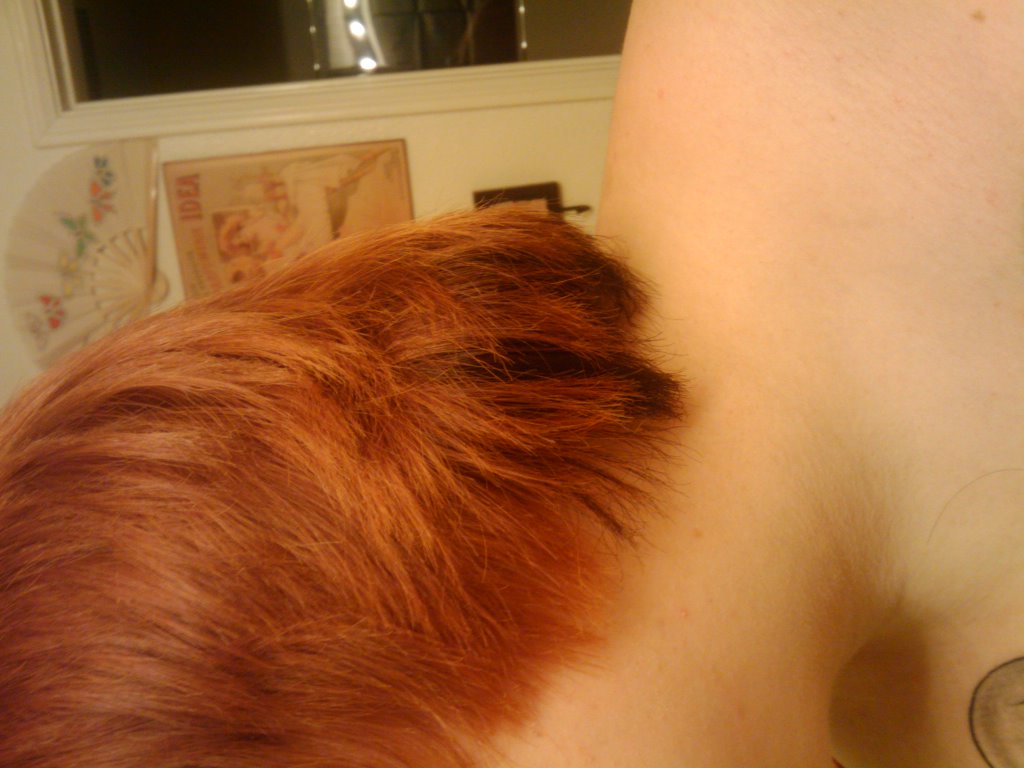
And the back.
You can see, its still shiny and its actually still pretty soft. After my second bleach( maybe tomorrow, maybe next week. I want to see how long my hair wants to breath before I hit it again) I'm hoping it will be a light blond...I'd be happy with a lighter version with this. I will need a trim at the end regardless but I'm not sure if I want to completely shave it off just yet :)
Tuesday, August 24, 2010
Long time No Post
So...I haven't done anything retro lately so I haven't posted anything. Sad Day. Tomorrow I will be posting up some pictures of me in the process of going blond and the method I use. I will be snipping off all of my hair into a faux hawk. I'm super excited!
I will also be trying out some home made deep conditioner recipes. I'm poor and I will need it with all the bleach I'm tossing into my hair. The most common ingredients are Honey, Mayo and Avocado. I'm fresh out of Avocado, but I'll try a few with the other two and we'll post up some Video tutorials on how to make and use them.
I've got the urge to paint some shoes. I will be trying to bust this project out asap.
Monday, August 2, 2010
CranieYums! Review
So...etsy..its the devil. Every time I go on etsy I end up spending more money than I have on things I know I don't need. This was the case the other day, did I need a little skull hair bow....no...did I have to have it? The answer to that riddle is YES Batman!
I have to say that I cheated this time and I didn't actually stumble upon this shop, I kinda sorta know the owner(and she is a DOLL!) and I had seen the product beforehand...all the same the bows are adorable and I am now addicted.
CranieYums is the etsy "shop for all your cutesy skull and bow needs."...that's pretty much accurate. The merch is mostly cute skull bows the the occasional cupcake or Frankenstein thrown in.


At the moment there are only bows up on the site, but from the sidebar I see that the owner also makes pins and necklaces. There are even bows for your pets! They come in different sizes, colors, patterns and with all kinds of charms. I will definitely be stopping back here again on my etsy adventures...I feel like I need that Frankenstein. If I could get her to make me a zombie life might be complete!
I have to say that I cheated this time and I didn't actually stumble upon this shop, I kinda sorta know the owner(and she is a DOLL!) and I had seen the product beforehand...all the same the bows are adorable and I am now addicted.
CranieYums is the etsy "shop for all your cutesy skull and bow needs."...that's pretty much accurate. The merch is mostly cute skull bows the the occasional cupcake or Frankenstein thrown in.

I actually stuck with the skulls for now but that Frankenstein is tempting...
All the charms on the bows are hand sculpted, painted and glazes in a "smoke free home". I'm not sure what that does for it but it is advertised on all of the bows so I'm going to say its a good thing (no smoke is good right, right.). The bows are attached to french barrettes, and on the smaller bow and the magnet the charm is glued down. On the larger bow it looks like a backing was baked in and it is sewn to the bow.

Being me, I had to get cheetah print.(This bow is actually what inspired my Cheetah Print Eye Tutorial) This is the Smaller of the two bows. It was $8

I also got a large red bow for $10
She also threw in a cute magnet for free! Here you can see the two bows side by side. The red bow has a larger bow and skull. You can also see the small differences between the three skulls that shows that they are actually made by hand( a touch that I rather like). I paid a few dollars for shipping and it literally got here next day. The bows arrived in a bubble wrapped envelope in perfect condition. The workmanship is high quality, and I was not disappointed. They are worth the price!
At the moment there are only bows up on the site, but from the sidebar I see that the owner also makes pins and necklaces. There are even bows for your pets! They come in different sizes, colors, patterns and with all kinds of charms. I will definitely be stopping back here again on my etsy adventures...I feel like I need that Frankenstein. If I could get her to make me a zombie life might be complete!
Go Goth With OPI
Every ones favorite nail polish brands has just released their new Halloween set. Go Goth! Personally I prefer the quality of china glaze to OPI and the brand is cheaper but I was given this set as a gift and was very excited to try it out.


(please excuse my poor photo, I'm still praying for the camera gods to bless me with a new camera after my last one met with a tragic fountain accident.)
The cute gift set comes with four colors and a lace cuff bracelet. The bracelet is very cute and I will be wearing it until it shreds off my body (that will probably be very soon.) The four colors are:
Unripened: Black with iridescent green sparkles
Nevermore: Deep Purple with a blue shimmer
Sanguine: Deep Red with lighter red shimmer
Obscurity: Black
The color I'm most excited for in this set is Sanguine. I have a million red's but there is always room for just one more.
I'm going to be honest here, the bottles are a PAIN to work with. They are tiny! When dipping the brush back in for more paint it often slipped off to the side of the bottle, and on more than one occasion the bottle tipped all the way over causing me to panic (I have white carpet!). The colors are not really anything we haven't seen before but they are nice. Obscurity doesn't look all that different from OPI's liquid leather, and liquid leather comes in a bigger bottle. The set is very cute and for under $10 you get to try 4 of OPI's colors (that's a steal, even if they are mini bottles) and you get a cute bracelet.
If your a fan of dark colors and OPI it might be worth the buy. If I hadn't been given this set I don't think I would have picked it up.
Sunday, August 1, 2010
Cheetah Print Eye Photo Tutorial


Next I not so carefully start adding in my spots. They don't have to be regular, or pretty. I don't close the circles all the way and I try to make them different sizes. I always start at the outer corner of my eye and work in, there is no reason for that...it's just easier for me :)

Now your going to take a small eye shadow brush (This is one I got in a kit and I cut down to the size that I needed) and dip it in a dark brown color. Your going to use this to fill in your spots.


Once your spots are all filled in your almost there. Now I take a regular winged eye liner pen (I got mine from hot topic for $1.50) and line the inside of your eye. Finish up with your favorite mascara and you are done!

There you go, looking super fly! Super easy, super quick!
Whats up?
So I've started over. Apparently my last blog name is also the name of something else and I needed to fix that. I think that Everyday Retro is a good, general name :)
What your going to see here....is a little bit of everything. I'm an everyday girl who likes to live and look like a retro rock star on an everyday( or smaller) budget. I've picked up tips and tricks along the way that I'd love to share with everyone and anyone who I can get to listen From hair and makeup to cars and furniture, if I've heard a tip, I've tried it. I'm also a product whore and will try almost anything to see if it fits into my lifestyle, if I try it, you will see it.
What I'm hoping to get out of this blog is a little escape from my real life. I work retail management in a clothing store, I'm sure we all know how that goes. If even one person thinks these tips are useful I'll be a happy camper. I think this is going to be a fun journey.
Subscribe to:
Posts (Atom)